
FAQ & Tips
Get answers to all the questions you have about MyBizMailerLast Updated: 8/21/2013 4:44:40 PM
The MyBizMailer Merge Tag Cheat Sheet
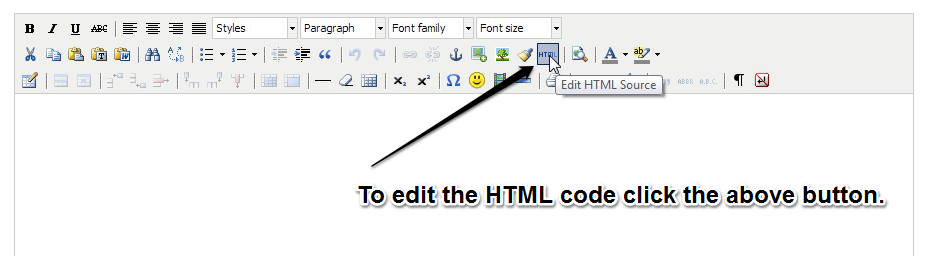
What are Merge Tags? Merge tags are quick and easy ways to pull into your campaign various information that is associated with your account. For example a Subscribers First Name or Email Address. Where do I find the Merge Tags? Merge tags are located in the top pull-down menu in the WYSIWYG editor that you use when you create your campaigns. How do I insert a merge tag into my campaign message? After you've selected the merge tag that you want to include in your message just click on the puzzle piece icon. Can I add a merge tag to my subject line? Yes. Do you have a list of all the merge tags that I can use in my campaigns? Yes. There's 15 standard merge tags that you can include in your messages. Below you will find the complete list of merge tags seperated out by section. Can I copy and paste a merge tag from the list below into my campaigns message. Yes (there's a couple exceptions though like the unsubscribe merge tag. Be sure just to copy and paste the brackets as well. For example if I wanted to include the subscribers first name in the message body of my campaign I would be sure to copy and paste the following {{{Subscriber:FirstName}}}. {{{Subscriber:FirstName}}} This pulls into your message the first name of the subscriber. {{{Subscriber:LastName}}} This pulls in the last name of the subscriber. {{{Subscriber:EmailAddress}}} This shows the subscribers email address. {{{Subscriber:Unsubscribe}}} This is the merge tag that lets subscribers easily and quickly unsubscribe from your newsletter. I know you'll be sad to see them go but you have to make this obvious to spot and easy for people to go through the process. Especially because it's not going to mandatory requirements when it comes down to abiding by the Canadian Anti Spam Laws. With this tag, if your going to use it, the easiest way is to use the pulldown merge tag option within the editor (as shown above). If you're going to copy and paste it into your message there's a couple additional steps. Step 1: Click on the HTML icon A new screen will pop up. Step2: Copy & Paste the following code into that popup window So what you'll see will look similar to the screenshot below... Step 3: Scroll down and click update. The unsubscribe from this newsletter functionality will now be included in your message. But in all honesty it's just way easier to use the pulldown merge tag option within the editor (as shown at the start of this article). {{{Subscriber:Title}}} This will display the title of the individual i.e. Mr. Mrs. {{{Subscriber:DOB}}} This displays the Date of Birth of the subscriber {{{Subscriber:Company}}} This will show the subscribers Company information. {{{Subscriber:Phone}}} This will show the subscribers phone number. {{{Subscriber:Address}}} This will display the subscribers physical mailing address. {{{Subscriber:City}}} This will show the subscribers City. {{{Subscriber:State}}} This will show the subscribers State. {{{Subscriber:Country}}} This will show the subscribers Country. {{{Subscriber:Forward}}} This allows subscriber to forward the message to a friend. This merge tag behaves similarly to the Unsubscribe merge tag in that it's best to use the pulldown merge tag option from with the WYSIWYG or Drag & Drop Editor. But if you wanted to copy and paste this merge tag into your campaign then follow the following steps Step 1: Click on the HTML icon A new screen will pop up. Step 2: Copy & Paste the following code into that popup window Step 3: Scroll down and click update. The Forward to a Friend functionality will now be included in your message. But in all honesty it's just way easier to use the pulldown merge tag option within the editor (as shown at the start of this article). {{{Subscriber:UpdateProfile}}} This gives your subscriber the ability to update their subscriber profile. This especially comes in handy when they are switching their emails over to another provider or moving jobs. {{{Subscriber:SignupDate}}} This can be used as a handy reminder of when the subscriber first "officially" subscribed to your newsletter. {{{Campaign:FromEmail}}} This displays your from email address. {{{Campaign:FromName}}} This displays your from email name. {{{Campaign:SendDate}}} This will inject your campaigns send date into the message. {{{Campaign:EmailLink}}} This inserts into your message a "View this message in your browser" option. This merge tag behaves similarly to the Unsubscribe merge tag in that it's best to use the pulldown merge tag option from with the WYSIWYG or Drag & Drop Editor. But if you wanted to copy and paste this merge tag into your campaign then follow the following steps Step 1: Click on the HTML icon A new screen will pop up. Step 2: Copy & Paste the following code into that popup window Step 3: Scroll down and click update. The View it in your browser functionality will now be included in your message. But in all honesty it's just way easier to use the pulldown merge tag option within the editor (as shown at the start of this article). {{{Account:Name}}} This will insert the name on your MyBizMailer account into your message. {{{Account:Address}}} This will insert the physical mailing address listed on your MyBizMailer account into your message. {{{Account:City}}} This will insert the City listed on your MyBizMailer account into your message. {{{Account:State}}} This will insert the State listed on your MyBizMailer account into your message. {{{Account:PostalCode}}} This will insert the Postal or ZIP code listed on your MyBizMailer account into your message. {{{Account:Website}}} This will insert the website URL listed on your MyBizMailer account into your message. {{{Account:Phone}}} This will insert the phone number listed on your MyBizMailer account into your message. {{{Account:Affiliate}}} This will insert the affiliate code that is associated with your MyBizMailer account into your message. {{{System:Date}}} This will insert the current date e.g.01/25/2011 {{{System:Year}}} This will insert the current year. If you have any questions or are stuck implementing these merge tags for your campaigns please send us a message by clicking here.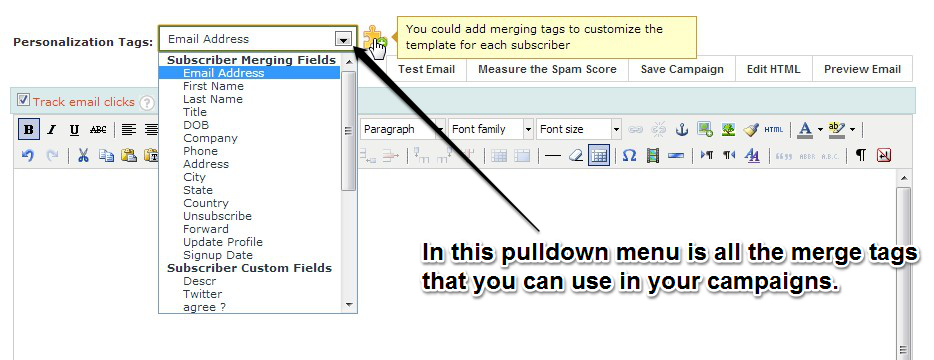

Subscriber Merge Tags
![]()
![]()
![]()
<p><a href="{{{Subscriber:Unsubscribe}}}" target="_blank">Unsubscribe</a></p> 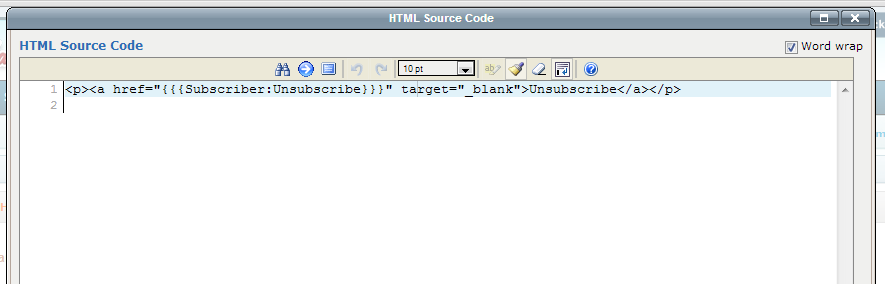
![]()
![]()
![]()
![]()
![]()
![]()
![]()
![]()
![]()
<p><a href="{{{Subscriber:Forward}}}" target="_blank">Forward to a Friend</a></p> ![]()
![]()
Campaign Merge Tags
![]()
![]()
![]()
<p>Having trouble reading this message? <a href="{{{Campaign:EmailLink}}}" target="_blank">View it in your browser</a></p> Account Merging Fields
![]()
![]()
![]()
![]()
![]()
![]()
![]()
System Merging Fields
![]()